Converting VM’s from VMware to Hyper-V in seconds (Part 1)
Converting VM’s from VMware to Hyper-V in seconds (Part 2)
Converting VM’s from VMware to Hyper-V in seconds (Part 3)
This part we will configure the Netapp controller so you can use it to convert VM’s from a VMware environment to a Hyper-V environment.
In this setup we use the NFS protocol for the ESX and SMB 3.0 for Hyper-V to present the storage.
We will use the Netapp SMI-S provider to connect Virtual Machine Manager with the Netapp controller.
Design
Well, every design is different.
In my environment I have 2 vlans, one for internal traffic (mgmt) and one for storage traffic (iscsi).
I’ve created a VM that will act as my Controller server, this is where the migration script will be running.
The migration script will use Powershell along with the VMM module, PowerCLI and the Netapp Data ONTAP module to get information from the various systems and actually fire off commands to create a VM or start the disk conversion from VMDK to VHDX.
I also installed the Netapp SMI-S agent on this machine but I will come back on that part later.

Configuring the Netapp controller
Requirements:
Netapp Controller with ONTAP 8.2 in clustered mode
Netapp Data ONTAP PowerShell Toolkit
Netapp Flexclone License
I’m expecting you have some knowledge about Netapp and the way to configure it.
We will use a script to configure the controller, but first you will need to create a aggregate using the “aggr create” syntax.
Next, a script will take care of the following tasks:
– Create vServer
– Enable CIFS
– Enable NFS
– Configure Networking
– Add controller to domain
– Configure DNS Settings
– Configure CIFS
– Configure NFS
– Create Volume
– Create CIFS Qtree Security
– Create NFS Qtree Security
The script can be downloaded >>>here<<<
The script is a part from the MAT toolkit, I’m not reinventing the wheel 😉
I edited the script so it doesn’t make a CIFS share, we will do this with VMM.
Edit the Variables.xml file and supply the correct parameters for the XML values.
The script will read the XML file and use the parameters to configure the controller.
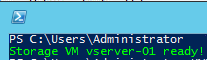
If the script runs successful, you will get the following result:
Netapp has also a nice tool available called “OnCommand”.
This is a web based GUI to view/configure the settings of the controller.
SMI-S Agent
Managing the Netapp controller from VMM means we need the Data ONTAP SMI-S Agent.
The Data ONTAP SMI-S Agent provides a standards based storage management interface that can be used to discover, monitor and manage NetApp storage systems, in this case for Virtual Machine Manager.
The SMI-S agent acts as a man in the middle, passing through information and commands.
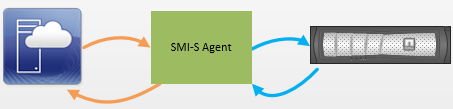
When the SMI-S Agent is in place we can create shares on the Netapp controller for placing VM’s through Virtual Machine Manager.
You can download the SMI-S Agent from the Netapp support site, you will need “Data ONTAP SMI-S Agent 5.0” as this version supports a Netapp Controller with ONTAP 8.2 in clustered mode.
You can install the agent about anywhere, i’ve installed it on the controller server but you could install it on your VMM server as well.
The installation is fairly simple.. next,next, finish.
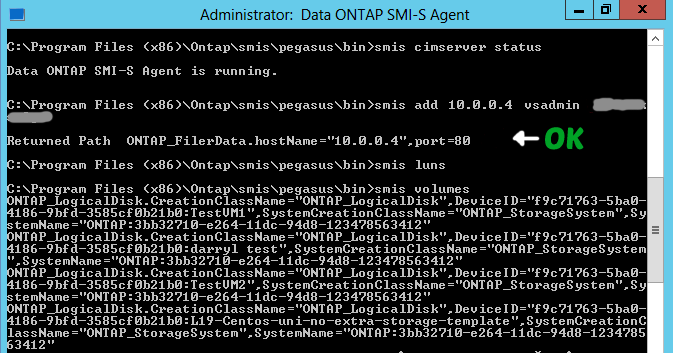
Open up the Agent command prompt, can be found in the start menu.
First check if the service is running
Then add the Netapp controller to the agent using the following cmd
When everything is OK, you can retrieve the volumes on the Netapp controller with
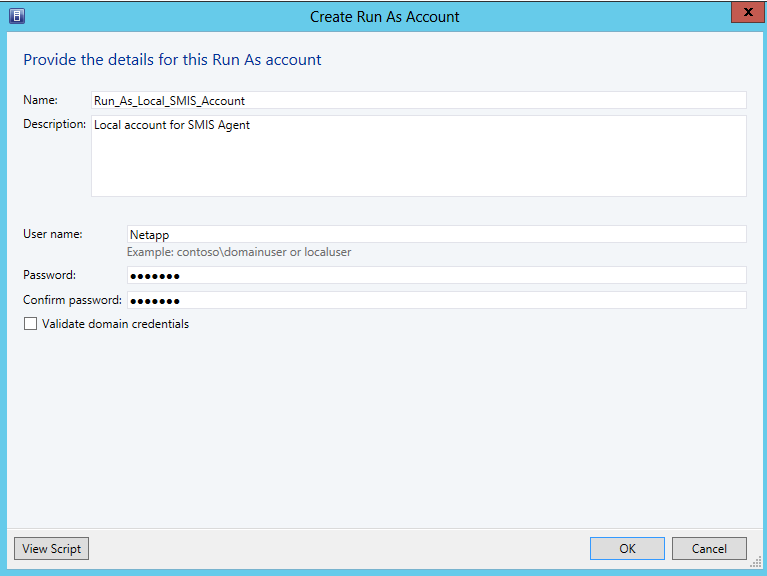
Next, create a LOCAL account on the server the SMI-S agent is running.
When your done, add the local user to the SMI-S agent service with the following command
(I have created a local user named “Netapp”)

This user will be used to grant permissions from Virtual Machine Manager to the SMI-S Agent service.
You will need to make the SMI-S connection on the Data port, not the MGMT port.
Keep this in mind when making your network design. I have routed VLANs so my controller server can connect to the data port of the netapp.
The Netapp controller has a firewall build in, connection to the controller may be blocked by the firewall.
Disable the firewall using the following command (for testing purposes):
system services firewall modify -node <nodename> -enabled false
Adding NetApp SMI-S Storage to Virtual Machine Manager
First, make sure you have your DNS records right, also PTR record.
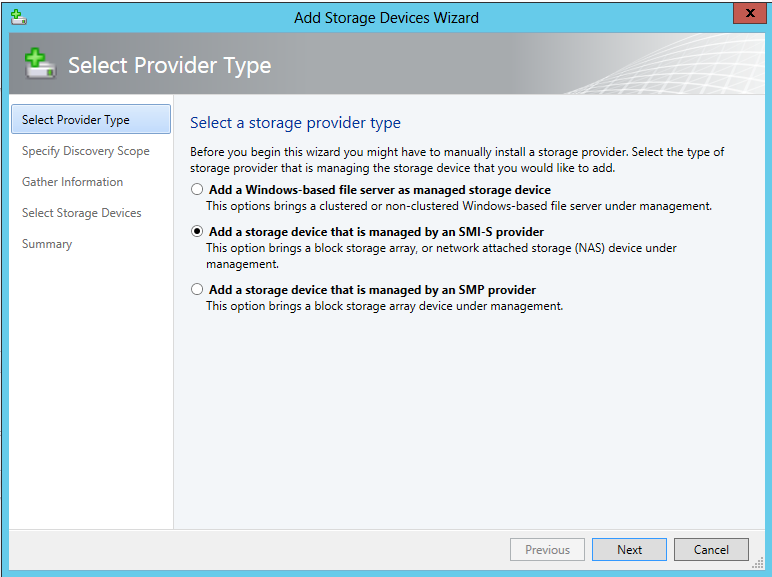
Open your VMM Console, Expand Fabric. Right click on Providers and click on “Add Storage Devices”. Then Click “Add a storage device that is managed by SMI-S provider”.
Select “SMI-S CIMXML” and fill in the IP address of the server the SMI-S agent is running on.

Click browse and create a new Run As account for the local user you created and click next
The wizard will now Discover the Netapp controller through the SMI-S Agent and when done, it discovers the vServer and volume created with the script.

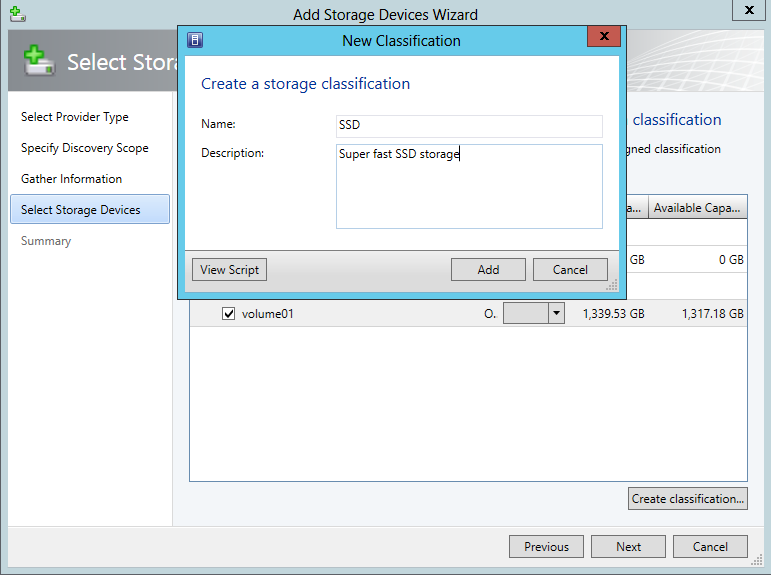
Click next and select the right volume and storage classification, if you don’t have a storage classification already then create one.
Click next to finish the wizard, all done.
The SMI-S agent is now showing under providers.
In the Fabric pane under “Classifications and Pools” you will see the created Storage classification and the assigned volume.

Please note the selected “Pool ID”, we will use this ID to identify the volume when creating the SMB 3.0 share.
To create a SMB 3.0 share on the Netapp controller, right click on “File Servers” and “Create File Share”.

In the dropdown you will see the same ID also shown in previous screenshot, meaning you will create a file share on the created volume on the Netapp controller.
Next, add the created SMB 3.0 fileshare to your cluster.
In the Fabric pane, go to the properties of your cluster, click “File Share Storage”, Add and type in the UNC path to the SMB share.
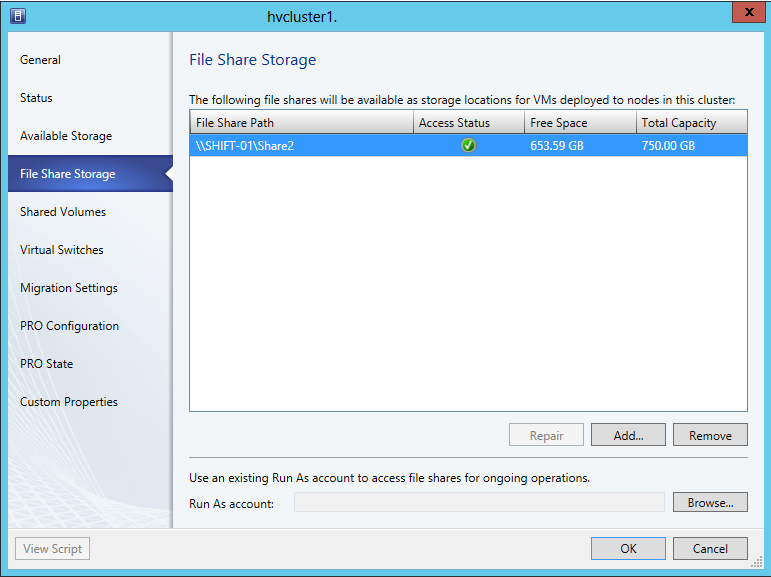
Select a user account to “Access file shares for ongoing operations”.
This can be a domain user as the Netapp controller is a member of your domain.
When everything goes right, your now able to deploy VM’s to the SMB 3.0 fileshare.
VMM will automatically set access on the share for your hosts, you can check this using the OnCommand tool or login with SSH to your controller and use the following commands:
Or grant access to a specific host (don’t forget to add your VMM library server(s) for deploying from the library on the share.)
Clustered Data ONTAP 8.2 CIFS/SMB Server Configuration Express Guide:
https://library.netapp.com/ecm/ecm_download_file/ECMP1287609/
All done!
We’ve configured the Netapp controller, setup the SMI-S agent and connected it to Virtual Machine Manager.
Now you should be able to access the SMB 3.0 fileshare we created and place VM’s on it with VMM.
The only thing left is to connect the Netapp storage over NFS with VMware.
In the next part I will show and explain:
– Converting VM’s from VMware to Virtual Machine Manager with all the settings.
– All the scripts used for collection of VM’s and creation of VM’s


2 thoughts to “Converting VM’s from VMware to Hyper-V in seconds (Part 2)”